Using Firebase, REST APIs, GraphQL, and StepZen to Build an Events Application

 Isaac Garcia
Editor's Note: This blog describes how Isaac uses GraphQL and StepZen to build an event organizing application. Using StepZen he converts REST API endpoints to GraphQL in minutes and links types with the @materializer directive. When it's ready, we look forward to linking and sharing Isaac's detailed walk-through of the app in this article. For now, follow Isaac on Twitter for updates, https://twitter.com/isaacwgarcia.
Organizing Events and Attendees with StepZen's @materializer
In this tutorial we build a dashboard that pulls in all event and attendees associated with an event organizer. You can see the event app here: https://eventdemo.vercel.app/
There are also dummy REST endpoints to help you build your own StepZen endpoint: https://eventdemo.vercel.app/api/owner?email=isaac@gmail.com
Firestore Data Model (optional)
Event owners need a reference point to organize all the events and attendees. I chose Firebase to store the event owner, event, and attendee information for the dashboard.
For a quickstart to create a Firestore Database, see Get started with Cloud Firestore.
Cloud Firestore is schemaless, so you have complete freedom over what fields you put in each document and what data types you store in those fields. Documents in the same collection can all contain different fields with different types for each field. However, it's a good idea to use the same fields and data types across multiple documents so that you can query the documents more easily.
The application will be linking firestore data for an event owner to review and coordinate upcoming, live, and past events. To organize this, we create three firestore collections.
- Events: The event that is going to occur or has previously occured.
└── Event (collection)
    └── {{ unique_event_id }} (document)
        ├── attendee_ids (array[strings])
        ├── id (string)
        ├── location (string)
        └── name (string)
- Attendees: This is not a list of those that are going to attend an event, but those that have attended a past or on-going event.
└── Attendee (collection)
    └── {{ unique_attendee_id }} (document)
        ├── event_ids (array[strings])
        ├── address (string)
        ├── email (string)
        ├── id (string)
        └── name (string)
- Event Owners: The event organizer that is associated with events by id.
└── Owner
    └── {{ unique_owner_id }}
        ├── event_ids (array[strings])
        ├── email (string)
        ├── id (string)
        └── name (string)
Build your NextJS App
First, run create-next-app.
npx create-next-app name_of_the_app
Install additional dependencies.
npm install next-connect typescript @types/node @types/react react-dom firebase
Building the Firebase REST Endpoints (optional)
Why REST endpoints to Firebase? Firebase provides a really well documented npm package for JavaScript applications. These REST endpoints will pair nicely with the GraphQL endpoint we build later on.
Open the app you just created to begin building the api REST endpoints. Building an API in NextJS is simple with the API Routes functionality. Just by creating an api folder in pages directory, the endpoint /api/ is ready to be curated.
By default, create-next-app generates an /api/hello.js file.
cd pages && cd api
First we need to initialize the Firestore Database Client. Defining our environment variables:
// next.config.js
module.exports = {
  reactStrictMode: true,
  env: {
    STEPZEN_API_KEY: process.env.STEPZEN_API_KEY,
    STEPZEN_API_URL: process.env.STEPZEN_API_URL,
    FIREBASE_API_KEY: process.env.FIREBASE_API_KEY,
    FIREBASE_AUTH_DOMAIN: process.env.FIREBASE_AUTH_DOMAIN,
    FIREBASE_PROJECT_ID: process.env.FIREBASE_PROJECT_ID,
    FIREBASE_STORAGE_BUCKET: process.env.FIREBASE_STORAGE_BUCKET,
    FIREBASE_MESSAGING_SENDER_ID: process.env.FIREBASE_MESSAGING_SENDER_ID,
    FIREBASE_APP_ID: process.env.FIREBASE_APP_ID,
  },
}
These firebase configuration values are added to the firebaseConfig object that we will create in our components folder:
mkdir components
cd components
// components/firebaseConfig.ts
const firebaseConfig = {
  apiKey: process.env.NEXT_PUBLIC_FIREBASE_API_KEY,
  authDomain: process.env.FIREBASE_AUTH_DOMAIN,
  projectId: process.env.FIREBASE_PROJECT_ID,
  storageBucket: process.env.FIREBASE_STORAGE_BUCKET,
  messagingSenderId: process.env.FIREBASE_MESSAGING_SENDER_ID,
  appId: process.env.FIREBASE_APP_ID,
}
export default firebaseConfig
In root, we define a file .env.local within the values:
### .env.local
STEPZEN_API_KEY=
STEPZEN_API_URL=
FIREBASE_API_KEY=
FIREBASE_AUTH_DOMAIN=
FIREBASE_PROJECT_ID=
FIREBASE_STORAGE_BUCKET=
FIREBASE_MESSAGING_SENDER_ID=
FIREBASE_APP_ID=
Create a lib folder that will contain db.ts. The firebaseConfig will initialize the firebase app here:
// components/lib/db.ts
//Firebase v9.6.6

import firebaseConfig from '../firebaseConfig'
import { initializeApp } from 'firebase/app'
import { getFirestore } from 'firebase/firestore'
const app = initializeApp(firebaseConfig)
const db = getFirestore(app)

export { db }
And now to write all the promises for the REST endpoint, create a dbUtil.ts.
Copy the full file here in the eventdemo repo.
// components/lib/dbUtil.ts
import { Event, Owner, Attendee } from '../lib/types'
import {
  collection,
  doc,
  getDoc,
  setDoc,
  query,
  where,
  getDocs,
  QuerySnapshot,
} from 'firebase/firestore'
import { db } from './db'

export async function createEvent(event: Event): Promise<void> {
  const eventRef = collection(db, 'Event')
  await setDoc(doc(eventRef, event.id), {
    attendee_ids: event.attendee_ids,
    date: event.date,
    description: event.description,
    location: event.location,
    name: event.name,
  })
}

export async function readEvent(id: string): Promise<Event> {
  const event = await getDoc(doc(db, 'Event', id))

  if (event.exists()) {
    return event.data() as Event
  } else {
    const json = '{"status":"not found"}'
    return JSON.parse(json)
  }
}

[..]
Write the types to ensure that specific objects are being handled in the typescript file for dbUtil.ts
// components/lib/types.ts
export interface Attendee {
  id: string
  name: string
  address: string
  phone: string
  email: string
  event_ids: String[]
}

export interface Event {
  id: string
  name: string
  date: number
  location: string
  description: string
  attendee_ids: String[]
}

export interface Owner {
  id: string
  name: string
  event_ids: String[]
  email: string
  phone: string
  username: string
  about: string
}
To save time, I recommend pulling down the code from the eventdemo repo.
└── pages
    └── api
        ├── event
        ├── eventList
        ├── attendee
        ├── attendeeList
        ├── owner
        ├── ownerList
Run the application
npm run dev
The endpoint http://localhost:3000/api/owner?email=isaac@gmail.com should return an owner object.
{
  "email": "isaac@gmail.com",
  "name": "Isaac Garcia",
  "id": "cSnwweJEE1PiTEinPbdTc",
  "event_ids": ["r4362w342pen"]
}
Create the StepZen GraphQL Endpoint
At this point, the app is serving REST endpoints. Now it is time to retrieve the data from the /api/ REST endpoints and unify our data with StepZen.
If you want to use your own endpoints rather than the endpoints at https://eventdemo.vercel.app/api, we'll need to deploy the /api/ REST endpoints to a public URL. To do so, we can deploy our NextJS app with Vercel. Copy the code here and deploy the repo to a new or existing vercel account, https://vercel.com/new.
Create a new project in Vercel: Vercel > Import the Git Repository. Remember to add the environment variables from the .env.local file to the project's configuration and deploy. The REST endpoints are set up and ready to be connected in the StepZen schema.
Creating the GraphQL Schema
In the StepZen folder, we create a schema (SDL) file named eventdemo.graphql. It matches the Firestore collections of owners, events, and attendees and also has the REST endpoints, which for this example we will use:
https://eventdemo.vercel.app/
In stepzen/eventdemo.graphql:
type Owner {
  id: String
  name: String
  email: String
  event_ids: [String]
  """
  Events that a person has been to.
  """
  events: [Event]
    @materializer(
      query: "event_list_by_id"
      arguments: [{ name: "id", field: "event_ids" }]
    )
}

type Owner_Events {
  id: String
  name: String
  email: String
  event_ids: [String]
}

type Event {
  form_fields: [Form_field]
  id: String
  location: String
  name: String
  attendee_ids: [String]!
  """
  People that have attended an event.
  """
  attendees: [Attendee]
    @materializer(
      query: "person_list_by_id"
      arguments: [{ name: "id", field: "attendee_ids" }]
    )
}

type Attendee {
  address: String
  email: String
  event_ids: [String]
  id: String
  name: String
  phone: String
  """
  Events that a person has been to.
  """
  events: [Event]
    @materializer(
      query: "event_list_by_id"
      arguments: [{ name: "id", field: "event_ids" }]
    )
}

type Query {
  """
  Equivalent To GET /api/events/id
  """
  firebase_event_by_id(id: String!): Event
    @rest(endpoint: "https://eventdemo.vercel.app/api/event/$id")

  """
  Equivalent To GET /api/person?email=$email
  """
  owner_by_email(email: String!): Owner
    @rest(endpoint: "https://eventdemo.vercel.app/api/owner?email=$email")
  """
  Equivalent To GET /api/eventList?id=$id
  """
  event_list_by_id(id: [String]): [Event]
    @rest(endpoint: "https://eventdemo.vercel.app/api/eventList?")
  """
  Equivalent To GET /api/personList?id=$id
  """
  person_list_by_id(id: [String]!): [Attendee]
    @rest(endpoint: "https://eventdemo.vercel.app/api/attendeeList?")

  """
  Equivalent To GET /api/owner/id
  """
  rest_owner_events_by_email(email: String!): Owner_Events
    @rest(endpoint: "https://eventdemo.vercel.app/api/owner?email=$email")
}
As shown in the schema above, there are two distinct fields in each type that links owners, events, and attendees into a single query.
For Owner, the event_ids return an array of strings, which can be passed as an argument to the events @materializer. StepZen appends this array of ids to the @rest endpoint.
type Owner {
  id: String
  name: String
  email: String
  event_ids: [String]
  """
  Events that a person has been to.
  """
  events: [Event]
    @materializer(
      query: "event_list_by_id"
      arguments: [{ name: "id", field: "event_ids" }]
    )
}
The same linking process is done in the Event type to retrieve all attendees associated with an individual event.
type Event {
  form_fields: [Form_field]
  id: String
  location: String
  name: String
  attendee_ids: [String]!
  """
  People that have attended an event.
  """
  attendees: [Attendee]
    @materializer(
      query: "person_list_by_id"
      arguments: [{ name: "id", field: "attendee_ids" }]
    )
}
Deploying and running your GraphQL endpoint
In the StepZen folder, run stepzen start and your GraphQL endpoint is generated. It is deployed and live immediately on StepZen.
Querying your GraphQL endpoint running on StepZen
Returning to the root of the project, adding the STEPZEN_API_URL and getting your [STEPZEN_API_KEY] from your StepZen dashboard now provides a GraphQL API to the dashboard.
### .env.local

STEPZEN_API_KEY=
STEPZEN_API_URL=
FIREBASE_API_KEY=
FIREBASE_AUTH_DOMAIN=
FIREBASE_PROJECT_ID=
FIREBASE_STORAGE_BUCKET=
FIREBASE_MESSAGING_SENDER_ID=
FIREBASE_APP_ID=
Expose the environment variables to the application.
// next.config.js

module.exports = {
  reactStrictMode: true,
  env: {
    STEPZEN_API_KEY: process.env.STEPZEN_API_KEY,
    STEPZEN_API_URL: process.env.STEPZEN_API_URL,
    FIREBASE_API_KEY: process.env.FIREBASE_API_KEY,
    FIREBASE_AUTH_DOMAIN: process.env.FIREBASE_AUTH_DOMAIN,
    FIREBASE_PROJECT_ID: process.env.FIREBASE_PROJECT_ID,
    FIREBASE_STORAGE_BUCKET: process.env.FIREBASE_STORAGE_BUCKET,
    FIREBASE_MESSAGING_SENDER_ID: process.env.FIREBASE_MESSAGING_SENDER_ID,
    FIREBASE_APP_ID: process.env.FIREBASE_APP_ID,
  },
}
To test the endpoint in our local enviroment, under our StepZen folder, we simply run stepzen start --dashboard=local and navigate to the GraphiQL in your browser:
http://localhost:5001/api/eventdemoapp
You can also test your GraphQL endpoint in the StepZen dashboard by running
stepzen startwithout the--dashboard=localflag.
Integrating the Frontend
Let's install a popular UI React Framework, MaterialUI.
npm install @mui/material @emotion/react @emotion/styled
To call the StepZen endpoint, we create a fetchAPI() function with our GraphQL query.
// components/lib/api.ts
import { APIConnection } from '../../stepzen/stepzenTypes'

async function fetchAPI(query: any, { variables }: APIConnection = {}) {
  const headers = {
    Authorization: `Apikey ${process.env.STEPZEN_API_KEY}`,
    'Content-Type': 'application/json',
  }

  const res = await fetch(`${process.env.STEPZEN_API_URL}`, {
    method: 'POST',
    headers,
    body: JSON.stringify({
      query,
      variables,
    }),
  })

  const json = await res.json()
  if (json.errors) {
    console.error(json.errors)
    throw new Error('Failed to fetch API')
  }
  return json.data
}

export async function getOwner(email: any) {
  try {
    const data = await fetchAPI(
      `
      query MyQuery {
        owner_by_email(email: "${email}") {
          name
          events {
            name
            location
            attendees {
              name
              email
              phone
            }
          }
        }
      }
      `
    )
    return data?.owner_by_email
  } catch (e) {
    return e.message
  }
}
In the same file, the owner_by_email() function passes our query owner_by_email to fetchAPI().
export async function getOwner(email: any) {
  try {
    const data = await fetchAPI(
      `
      query MyQuery {
        owner_by_email(email: "${email}") {
          name
          events {
            name
            location
            attendees {
              name
              email
              phone
            }
          }
        }
      }
      `
    )
    return data?.owner_by_email
  } catch (e) {
    return e.message
  }
}
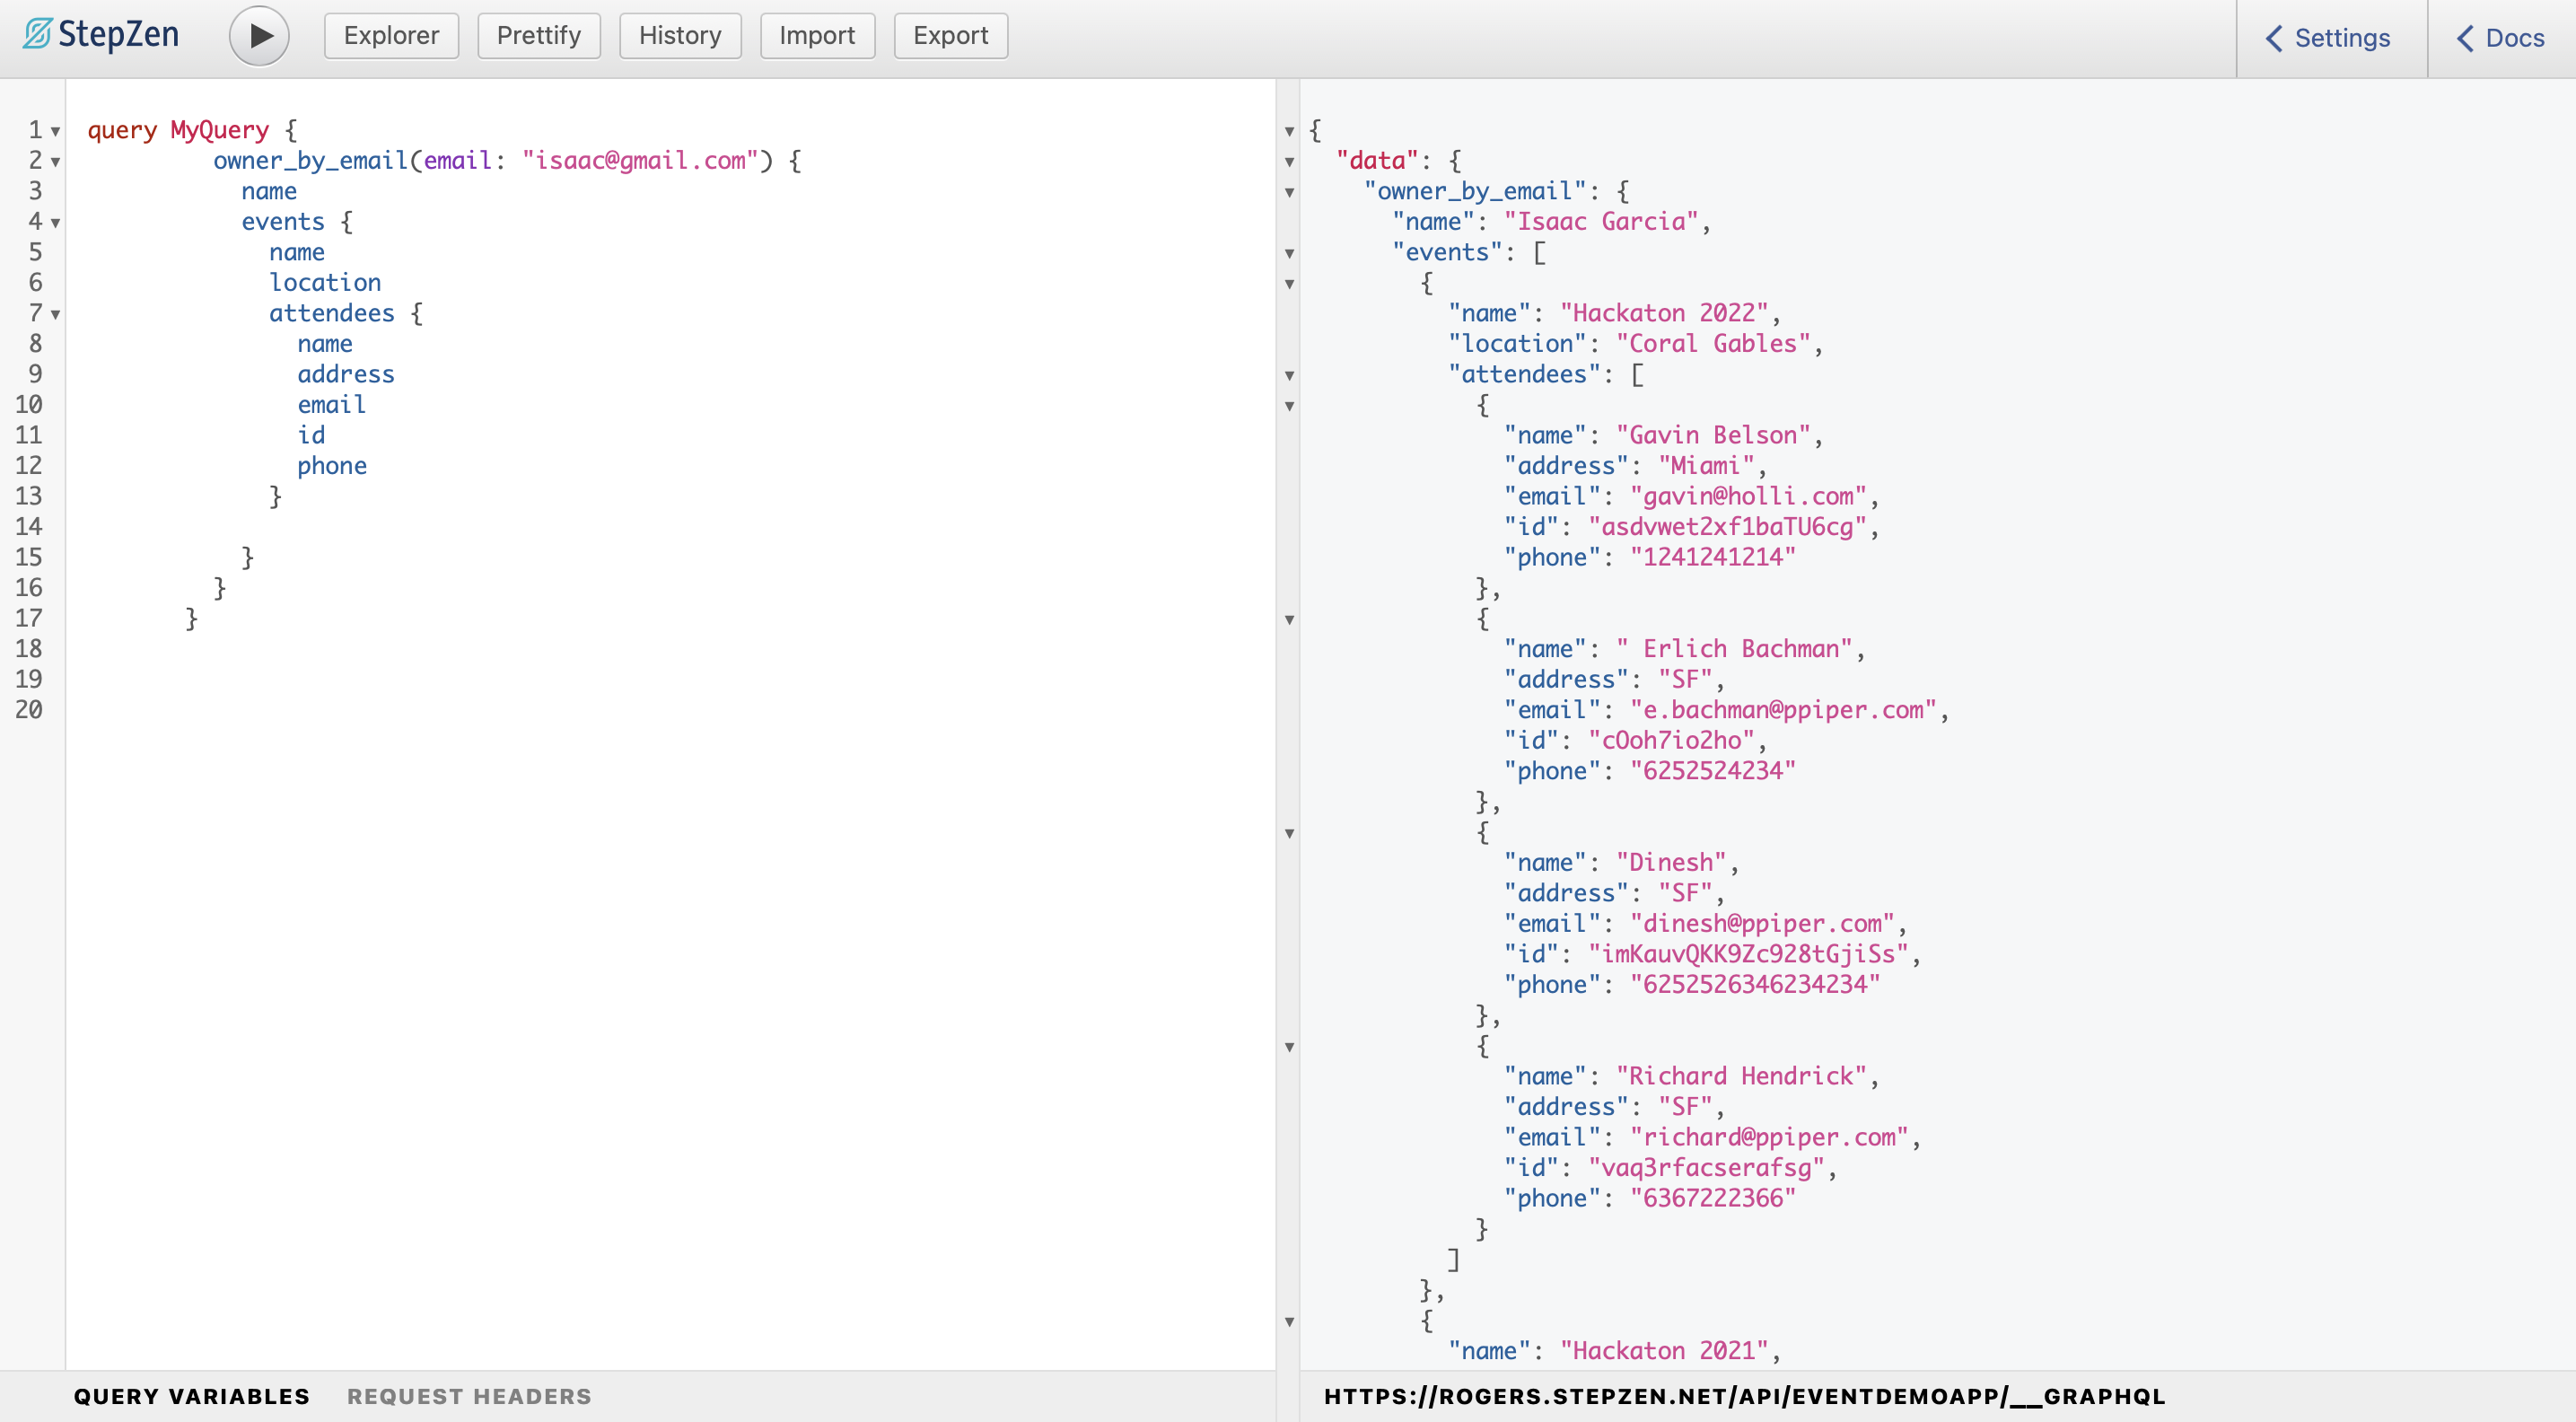
If the event owner email exists in our database, StepZen responds with the owner and all the associated events, which are followed by a nested array of attendees to each event, just like magic.
Now we can create a personalized page for each owner, using dynamic routes.
Create a personalized page for each owner
Build out the owner page to view the events and attendees associated with isaac@gmail.com.
Copy the full file here in the eventdemo repo.
// pages/owner/[id].tsx

import * as React from 'react'
import { styled } from '@mui/material/styles'
import Grid from '@mui/material/Grid'
import Paper from '@mui/material/Paper'
import Box from '@mui/material/Box'
import Typography from '@mui/material/Typography'
import ButtonBase from '@mui/material/ButtonBase'
import { getOwner } from '../../components/lib/api'

const Img = styled('img')({
  margin: 'auto',
  display: 'block',
  maxWidth: '100%',
  maxHeight: '100%',
})
function Owner(data: any) {
  return (
    [...]
  )
}

export async function getStaticPaths() {
  return {
    paths: [{ params: { id: 'isaac@gmail.com' } }],
    // Enable statically generating additional pages

    fallback: true, //if it didnt render, it will render once requested.
  }
}

export const getStaticProps = async (context: any) => {
  const email = context.params.id
  const response = await getOwner(email)
  if (response.events)
    return {
      props: {
        email: email,
        events: response.events,
      },
    }
  else {
    return {
      props: {},
    }
  }
}

export default Owner
Run the application
npm run dev
And visit the /owner/isaac@gmail.com page
http://localhost:3000/owner/isaac@gmail.com
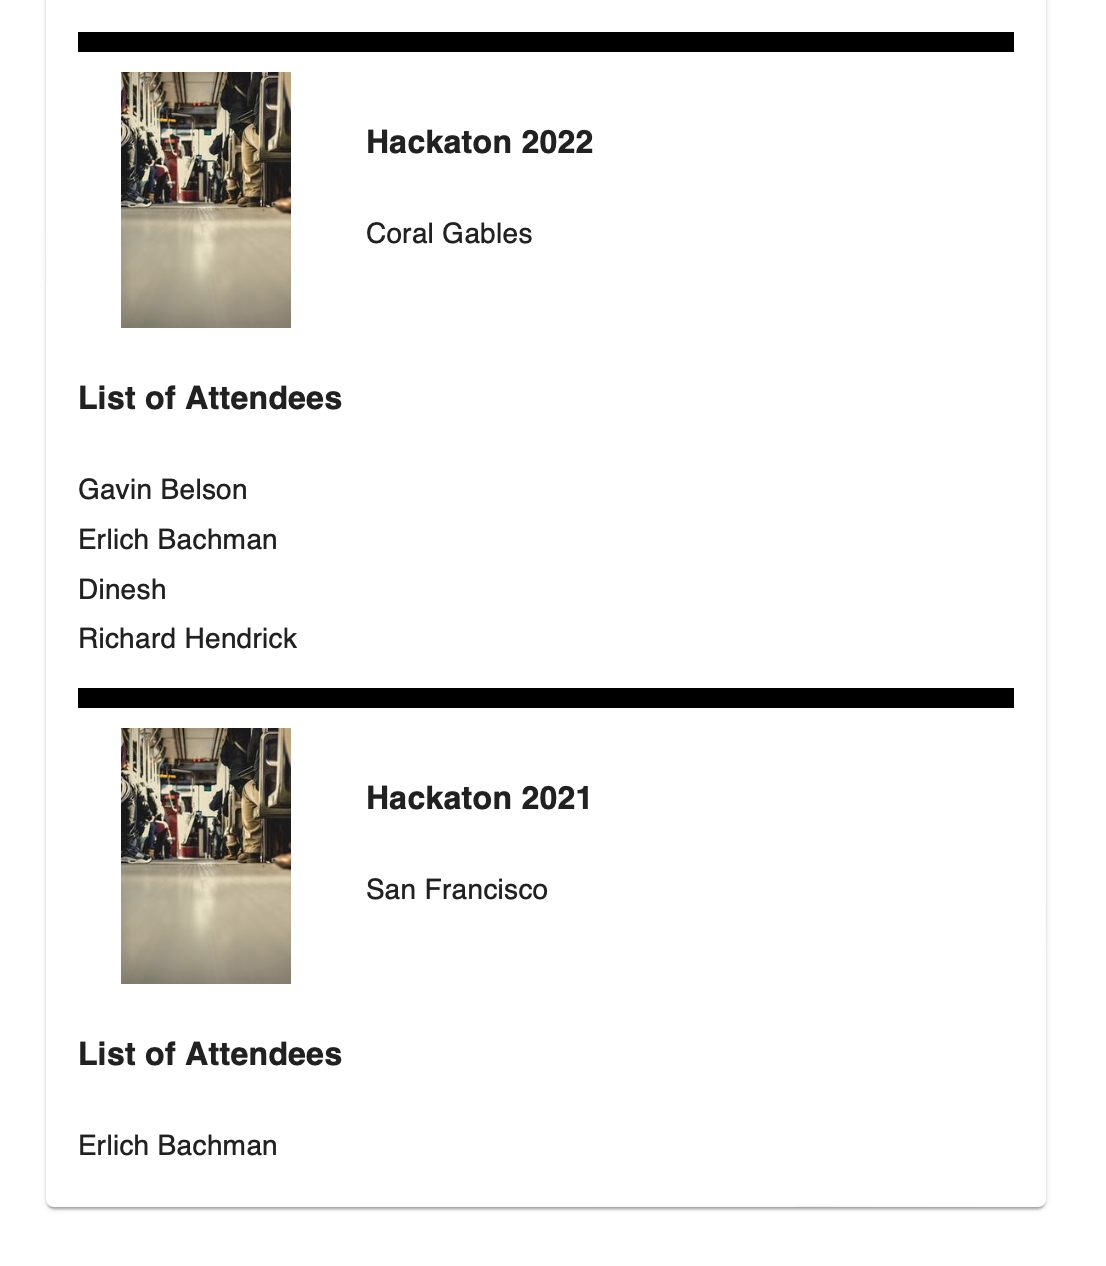
Voila! A page per owner is now showing the events and its attendees.
Where to Go From Here
The example above highlights the ease of linking data together to provide value to an event owner. For a production ready dashboard, a login experience is required. Here we focused on the backend logic rather than the frontend authentication flow.
If you are interested in setting up a full dashboard experience, a tutorial is in the works. Follow me on twitter for updates @isaacwgarcia.
You can find more example repositories at the StepZen Github. If you're not already signed up for StepZen, you can sign up here and/or join the Discord Community.